In our last blog, we covered all the basic concepts of Apache Airflow. In this blog, we will cover some of the advanced concepts and tools that will equip you to write sophisticated pipelines in Airflow. With the help of these tools, you can easily scale your pipelines. Let’s begin with some concepts on how scheduling in Airflow works.
Airflow Scheduler
Airflow comes with a very mature and stable scheduler that is responsible for parsing DAGs at regular intervals and updating the changes if any to the database. The scheduler keeps polling for tasks that are ready to run (dependencies have been met and scheduling is possible) and queues them to the executor. There are various things to keep in mind while scheduling a DAG.
DAG Execution Date
The execution_date is the logical date and time at which the DAG Runs, and its task instances, run. This also acts as a unique identifier for each DAG Run.
DAG Start Date
While creating a DAG one can provide a start date from which the DAG needs to run.
main_dag = DAG(
 dag_id='test_dag',
 schedule_interval=timedelta(hours=1),
 start_date=datetime(2016, 1, 1)
)
There’s a small catch with the start date the DAG Run starts one schedule interval after the start_date. In the above example, the start date is mentioned as 1st Jan 2016, so someone would assume that the first run will be at 00:00 Hrs on the same day. But this is not the case with airflow, the first instance will be run at one scheduled interval after the start date, that is at 01:00 Hrs on 1st Jan 2016. This is a common problem users of Airflow face trying to figure out why their DAG is not running.
It is also recommended to use static date times instead of dynamic dates like time.now() as dynamic dates can cause inconsistencies while deciding start date + one schedule interval because of the start date changing at every evaluation.
Airflow Trigger Rules
Airflow provides several trigger rules that can be specified in the task and based on the rule, the Scheduler decides whether to run the task or not. Here’s a list of all the available trigger rules and what they mean:
- all_success: (default) all parents must have succeeded
- all_failed: all parents are in a failed or upstream_failed state
- all_done: all parents are done with their execution
- one_failed: fires as soon as at least one parent has failed, it does not wait for all parents to be done
- one_success: fires as soon as at least one parent succeeds, it does not wait for all parents to be done
- none_failed: all parents have not failed (failed or upstream_failed) i.e. all parents have succeeded or been skipped
- none_failed_or_skipped: all parents have not failed (failed or upstream_failed) and at least one parent has succeeded.
- none_skipped: no parent is in a skipped state, i.e. all parents are in success, failed, or upstream_failed state
- dummy: dependencies are just for show, trigger at will
depends_on_past
depends_on_past is an argument that can be passed to the DAG which makes sure that all the tasks wait for their previous execution to complete before running. While this can be helpful sometimes to ensure only one instance of a task is running at a time, it can sometimes lead to missing SLAs and failures because of one stuck run blocking the others. Thus, this feature needs to be used with caution.
Airflow Variables and Connections
Airflow Variables
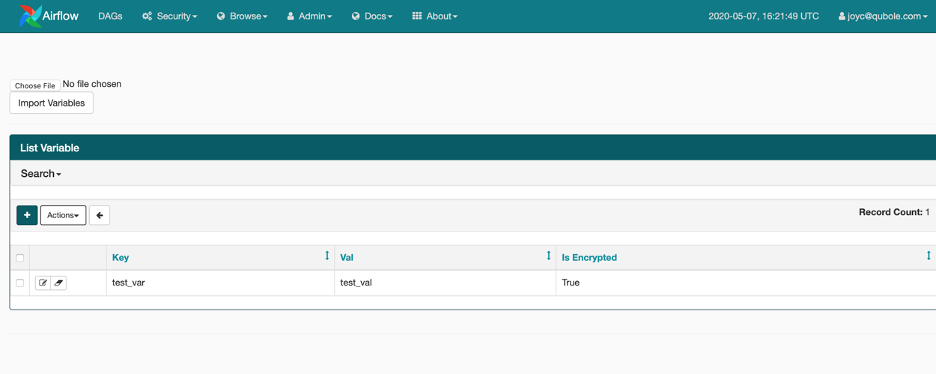
Variables in Airflow are a generic way to store and retrieve arbitrary content or settings as a simple key-value store within Airflow. Variables can be listed, created, updated, and deleted from the UI (Admin -> Variables), code, or CLI. In addition, JSON settings files can be bulk uploaded through the UI.
DAG code and the constants or variables related to it should mostly be stored in source control for proper review of the changes. But sometimes it can be useful to have some dynamic variables or configurations that can be modified from the UI at runtime. Here are a few examples of variables in Airflow.
from airflow.models import Variable
# returns the key `test_var` from the table `variable`
test = Variable.get("test_var")# since deserialize_json is set to True,
# it assumes that the entry in the table is a JSON
# and converts it into a dict return type,
# throws error if variable is not json
json_var = Variable.get("json_var", deserialize_json=True)# this is same as the first one,
# except if the value is not present in the table it returns None
# instead of returning exception
default_var = Variable.get("default_var", default_var=None)
Variables on Airflow Webserver
Airflow Connections
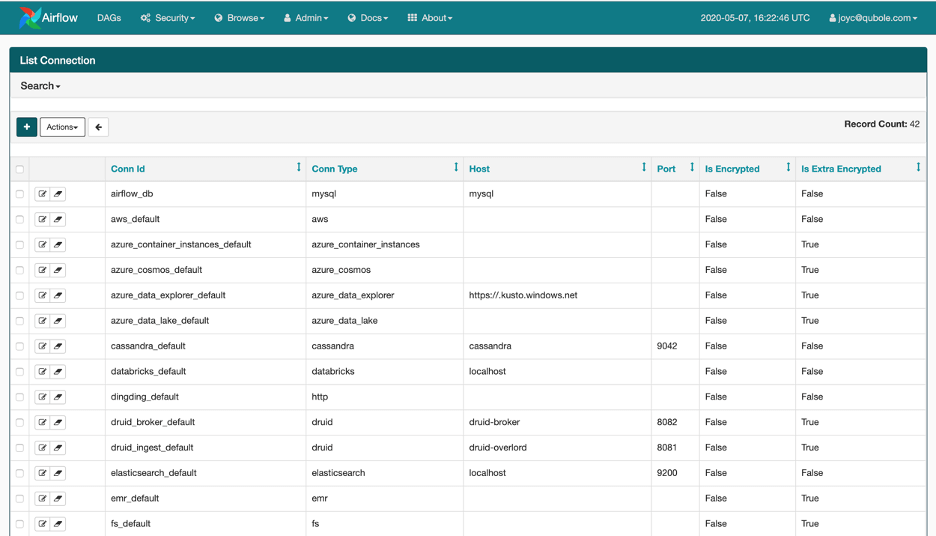
Connections are a way to store the information needed to connect to external systems. This information is kept in the Airflow metastore database and can be managed in the UI (Menu -> Admin -> Connections). A connection id (conn_id) is defined there, and host-name / login/password/schema information is attached to it. Airflow pipelines retrieve centrally managed connections information by specifying the relevant conn_id. Sensitive fields like passwords etc can be stored encrypted in the connections table of the database.

Connection list on Webserver
Airflow Pools
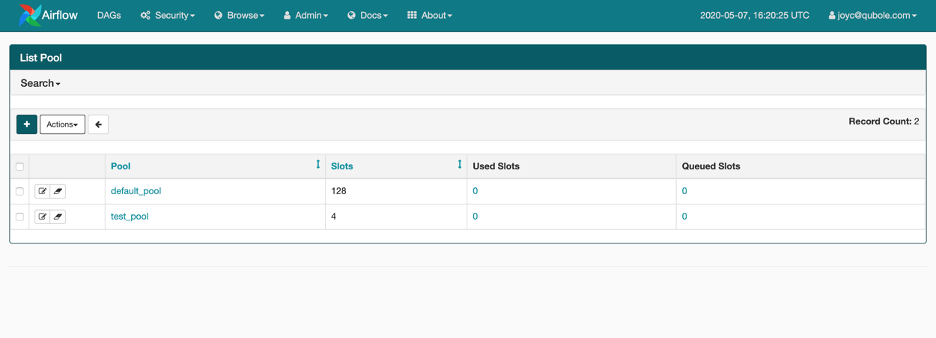
Pools in Airflow are a way to restrict the simultaneous execution of multiple high-resource tasks and thus prevent the system from getting overwhelmed. Pools are used to limit the number of parallel executions of a set of DAGs or tasks and it is also a way to manage the priority of different tasks by making sure a certain number of execution slots are always available for certain types of tasks. One can create or manage the list of pools from the Admin section on the Airflow webserver and the name of that pool can be provided as a parameter when creating tasks.
Here’s an example of how pools can be specified at the task level to provide which task should run on which pool.
bash_task = BashOperator(
 task_id='bash_task',
 bash_command='echo "hello world"',
 pool='test_pool',
 dag=dag)

List of pools on Airflow Webserver
Airflow Queues
As mentioned earlier Pools in airflow can also be used to manage the priority of tasks. This can be achieved with the help of the priority_weight parameter. priority_weight defines the priority of a task within a Queue or a pool as in this case. The default value of priority_weight is 1 but can be increased to any number and the higher the value, the higher the priority. When deciding on which task to execute next, the priority weight of a task with the weights of all the tasks downstream to it is used to sort the queue. If a task is important and needs to be prioritized, its priority can be bumped up to a number higher than the priority_weight of others.
Tasks for a pool are scheduled as usual while all the slots get filled up. Once the limit of the pool is reached, all the runnable tasks go into the queued state but are not picked up by the executor as no slots are available in the pool. Once the slots start freeing up, the queued tasks are sorted on the basis of priority_weight and the one with the highest priority is picked for execution.
The queue is something specific to the Celery Executor. When queuing tasks from celery executors to the Redis or RabbitMQ Queue, it is possible to provide the pool parameter while instantiating the operator. When starting a worker using the airflow worker command a list of queues can be provided on which the worker will listen and later the tasks can be sent to different queues. This is useful when it is required to run tasks of one type on one type of machine.
Airflow SLAs
Service Level Agreements (SLAs), represent the time by which a task or DAG should have been completed and can be set at a task level as a time delta. If one or more instances have not succeeded by that time, an alert email is sent detailing the list of tasks that missed their SLA. The event is also recorded in the database and made available in the web UI under Browse->SLA Misses where events can be analyzed and documented.
SLAs in Airflow can be configured for each task through the SLA parameter. In case there’s a breach in SLA for that specific task, Airflow by default sends an email alert to the emails specified in the task’s email_list parameter. There’s also an option to perform custom operations in case of an SLA breach by passing a python callable to the sla_miss_callback parameter of that task which gets invoked in case of any breach in SLA.
Jinja Templating
Airflow takes advantage of the power of Jinja Templating and this is a powerful tool to use in combination with macros. Jinja templating allows providing dynamic content using Python code to otherwise static objects such as strings. Since airflow Macros are evaluated while the task gets run, it is possible to provide parameters that can change during execution. For example, passing the result of one operator to another one that runs after it.
Also, parameters such as execution dates can be passed to fields. All operators define some of the fields that are template-able, and only those fields can take macros as inputs.
bash_task = BashOperator(
 task_id="execution_date",
 bash_command="echo 'execution date : {{ ds }} ds_add: {{ macros.ds_add(ds, 2) }}'"
)
In the above example, we run a bash command which prints the current execution date and it uses an inbuilt method ds_add to add 2 days to that date and prints that as well. Here’s a list of all the macros and the methods available by default in Airflow.
With all this knowledge about different concepts of Airflow, we are now equipped to start writing our first Airflow pipeline or DAG. In our next blog, we will write a DAG with all these advanced concepts, schedule it, and monitor its progress for a few days.


