This post has been co-authored by Aswin Anand and Lalit Indoria, who are part of the UI Engineering team at Qubole.
The front-end team at Qubole has been striving to provide the best web experience possible. In our efforts to achieve this, we rolled out a new version of the cluster management page which is an advanced and interactive application powered by Ember.js.
When we decided to revamp our existing cluster management page, we wanted it to be reliable, fast, and engaging. That said, we also wanted to get rid of writing boilerplate code and reinventing the wheel. We needed a framework that could help us reduce the time taken in arriving at architectural decisions. While we explored Angular JS, React JS, and Backbone for building our new application, we were highly impressed with the way Ember JS could fit into our current architecture with RoR running on the server. Ember JS has a strong community that is committed to make Ember the best way to build interactive modern applications. Ember JS is a technology none of us in the front-end team were familiar with, but the community has been very supportive in guiding us about how we could exploit the framework’s features to build an interactive application.
This blog post outlines how Ember has helped us scale our front-end stack and our experience building the most interactive single-page application within Qubole.
Reduced Bikeshedding with Ember Data
Building an application without a framework increases the burden on developers in taking technological decisions and often leads to bikeshedding. Fortunately, Ember Data is a service that solves the problem by leveraging Serializers that serializes the data sent to and received from the server using the JSON API format. To minimize the effort of sending data in JSON API format, we can easily customize these serializers or use our own serializers to make sure our Ember application is compatible with any backend framework. Ember Data works well with JSON APIs over HTTP as well as with streaming WebSockets.
Debugging with Ember Inspector
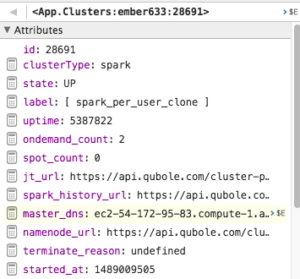
Debugging issues in an application is an integral part of any developer’s job and Ember Inspector helps you do that in the best way possible. Ember Inspector is a browser add-on that helps you debug your ember application and integrates very well with Ember Data. The Data tab in Ember inspector shows the list of model types defined in the application along with the number of records loaded for each model type.
Every cluster in the clusters listing page in Qubole represents a single record. The data tab in Ember Inspector shows the number of records loaded which is also the number of clusters you have in your account. The Ember Data tab lists those records and allows us to inspect every cluster’s data that has been loaded in the model. We could also change this information within the inspector to see how the UI reacts to the change. For example, we could simply change the state of a cluster within Ember Inspector to “DOWN” and the cluster would then appear to be down in the clusters listing page. This is particularly useful when you wish to test the application with different data sets without having to modify the API response or hardcode any of those values into the application.
Two-way data binding
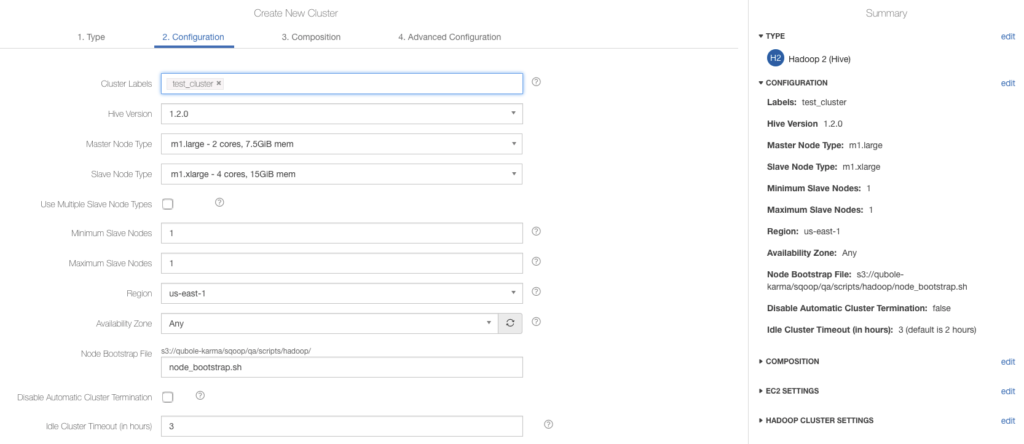
Data binding in Ember creates a link between two objects in a way that any change in one object updates the other automatically and vice versa. This can be illustrated when you create/edit a cluster and see the values getting updated in Summary Pane with a change in any of the cluster config fields.
This helps us create an interactive web experience using which our users can understand how changing one field in the cluster configuration could affect other fields. While we have simplified the way clusters could be created on Qubole, we have also made it really easy for users to jump across different steps within the cluster configuration wizard using the summary pane which holds the entire cluster config data at any point in time.
Ember also helps you establish one-way data binding which means that changes in one object are propagated only in one direction. A fine example of this is the search and filter that you see on the clusters listing page. When you filter the list of clusters and hit the Apply button, the URL of the page changes and has the filters in the query params. These query params are propagated deep into the components and are bound to user input. Since we do not want the query params to change instantly as our users type a search query, we propagate this data only in one direction and change the query params only when the user hits the Apply button.
Ember’s transition from Controllers to Components
Ember 2.0 has gone to great lengths towards making everything a component. Ember’s components let us take complete control over a section of the DOM. This helps us reuse the same JavaScript and HTML code multiple times within the application. The action buttons seen on the clusters listing page contribute to a component. This component is then reused with the cluster details page (where you see the node’s information, cluster usage report, and node time graph). The resources dropdown seen within the cluster actions is a nested component which is also reused in the cluster details page but in a tabular form. Showing cluster status and type are also as simple as including a single line into the handlebars template.
Apart from the reuse of code, Ember also provides lifecycle hooks with components. These hooks let us define the logic that should be executed when a component willRender, didInsertElement, willDestroyElement, and so on. One of the hooks that we use extensively is the didInsertElement which helps us initialize third-party libraries as soon as the component’s HTML has been inserted into the DOM. This helps us wrap jQuery plugins as reusable components that can be inserted into DOM as simple tags. Examples of this would be the dropdown boxes with the search for master and slave node types and help icons on the cluster configuration page.
Storing the Transient States using Services
Services in Ember are Objects that can store data temporarily until the duration of the application. The notifications displayed on the cluster management page are great examples of an Ember. Service object. Since these notifications are temporary and are flushed out after a few seconds, it is best to store them in services. These notifications persist irrespective of route changes and would be shown even if users navigate between different parts of the cluster management application to ensure they don’t miss anything displayed as a response to their actions.
We also use services to store the node’s information which is seen on the cluster details page. This is because we do not want the nodes table to be refreshed every time a user tries to access them. We refresh them only when there is a change in the number of nodes or if the state of the cluster has changed. While this reduces the number of API calls to fetch data, it also results in a much better user experience when the cluster isn’t scaling up or down.
Leveraging Mixins to scale across different clouds
Scalability is an important factor to consider while choosing a framework to build your application and Ember helps you achieve that using Mixins. Any property or functionality defined within a mixin is shared among all classes that extend the mixin. In our cluster management application, almost everything leverages the use of mixins. Starting from routes to the smallest component like showing the cluster usage data, we have extended all classes using mixins. This has been very useful when we added support for more clouds apart from AWS. Any shared functionality between these clouds now resides within mixins. This has helped us scale in such a way that adding support for a new cloud is now a piece of cake.
Unit testing in Ember JS
One of the major concerns while integrating Ember with our current JavaScript codebase was unit testing. We have been using mocha to run tests against our JavaScript modules and wanted to continue using it with Ember as well. To achieve this, we made use of ember-mocha which provides Mocha-specific wrappers around the helpers contained in ember-test-helpers. Ember mocha has helped us test every individual class separately. All of the routes, controllers, components, mixins, models, and helpers have been unit-tested with around 90% code coverage. With these unit tests in place, we feel pretty confident in adding new functionality to the application.
Reflections after a month
Ember’s convention over the configuration paradigm has helped us reduce our cognitive overhead. As a result of this, the cluster management page that we recently released had the least number of bugs when compared to other pages we built using plain JavaScript. Ember JS has been built with developers in mind and the time we spend adding new features to the cluster management page has now reduced 10 folds. The introduction of Ember JS would also help us in onboarding new engineers who might have worked with any MVC framework in their careers.
The web is evolving too fast and though it’s impossible to keep up with new tools, Ember has helped us exploit the latest technologies available in modern browsers today.


