Now that you have read about how different components of Airflow work and how to run Apache Airflow locally, it’s time to start writing our first workflow or DAG (Directed Acyclic Graphs). As you may recall workflows are referred to as DAGs in Airflow. If you haven’t already read our previous blogs and wish to know about different components of airflow or how to install and run Airflow please do.
But before writing a DAG, it is important to learn the tools and components Apache Airflow provides to easily build pipelines, schedule them, and also monitor their runs. Here we will list some of the important concepts, provide examples, and use cases of the same. If you wish to read the complete documentation of these concepts, it’s available here on the Airflow Documentation site.
Airflow DAGs
DAGs are a collection of tasks where all the tasks (if connected) are connected via directed lines. Traversing the graph, starting from any task, it is not possible to reach the same task again hence, the Acyclic nature of these workflows (or DAGs).
DAGs are defined using Python code in Airflow, here’s one of the examples dag from Apache Airflow’s Github repository. Here, we have shown only the part which defines the DAG, the rest of the objects will be covered later in this blog.
from airflow import DAG
dag = DAG(
dag_id='example_bash_operator',
schedule_interval='0 0 * * *',
dagrun_timeout=timedelta(minutes=60),
tags=['example']
)
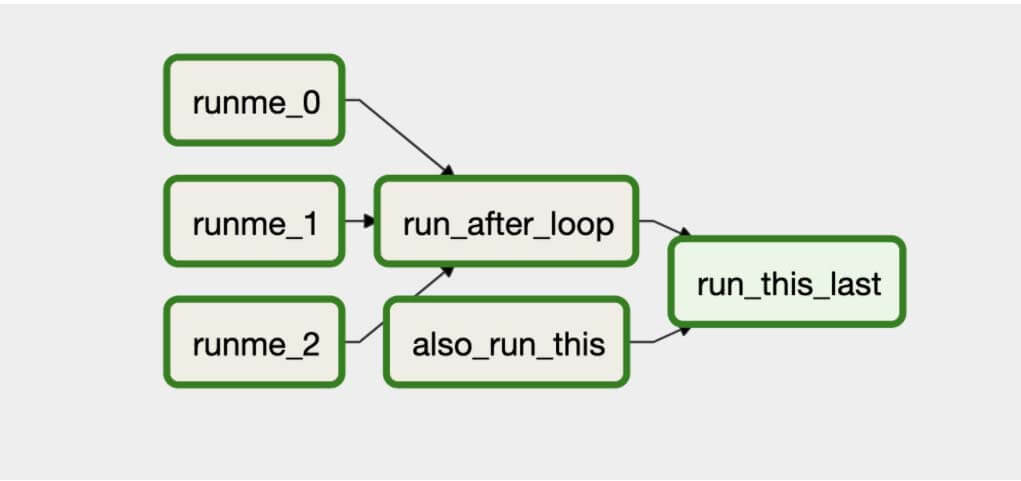
The above example shows how a DAG object is created. Now a dag consists of multiple tasks that are executed in order. In Airflow, tasks can be Operators, Sensors, or SubDags details of which we will cover in the later section of this blog. Using these operators or sensors one can define a complete DAG that will execute the tasks in the desired order. Here’s an image showing how the above example dag creates the tasks in DAG in order:

A DAG’s graph view on Webserver
DAG Graph View
DAGs are stored in the DAGs directory in Airflow, from this directory Airflow’s Scheduler looks for file names with dag or airflow strings and parses all the DAGs at regular intervals, and keeps updating the metadata database about the changes (if any).

Trigger a DAG Button
Trigger a DAG
DAG run is simply metadata on each time a DAG is run. Whenever someone creates a DAG, a new entry is created in the dag_run table with the dag id and execution date which helps in uniquely identifying each run of the DAG. DAG Runs can also be viewed on the webserver under the browse section.
List DAG Runs

List of DAG Runs on Webserver
Dag Operators and Sensors
DAGs are composed of multiple tasks. In Airflow we use Operators and sensors (which is also a type of operator) to define tasks. Once an operator is instantiated within a given DAG, it is referred to as a task of the DAG.
DAG Operator
An Operator usually provides integration to some other service like MySQLOperator, SlackOperator, PrestoOperator, etc which provides a way to access these services from Airflow. Qubole provides QuboleOperator which allows users to run Presto, Hive, Hadoop, Spark, Zeppelin Notebooks, Jupyter Notebooks, and Data Import / Export on one’s Qubole account.
Some common operators available in Airflow are:
- BashOperator – used to execute bash commands on the machine it runs on
- PythonOperator – takes any Python function as an input and calls the same (this means the function should have a specific signature as well)
- EmailOperator – sends emails using an SMTP server configured
- SimpleHttpOperator – makes an HTTP request that can be used to trigger actions on a remote system.
- MySqlOperator, SqliteOperator, PostgresOperator, MsSqlOperator, JdbcOperator, etc. – used to run SQL commands
- Qubole Operator: allows users to run and get results from Presto, Hive, Hadoop, Spark Commands, Zeppelin Notebooks, Jupyter Notebooks, and Data Import / Export Jobs on the configured Qubole account.
DAG Sensors
Sensors are special types of operators whose purpose is to wait on some external or internal trigger. These are commonly used to trigger some or all of the DAG, based on the occurrence of some external event. Some common types of sensors are:
- ExternalTaskSensor: waits on another task (in a different DAG) to complete execution.
- HivePartitionSensor: waits for a specific value of partition of hive table to get created
- S3KeySensor: S3 Key sensors are used to wait for a specific file or directory to be available on an S3 bucket.
DAG Hooks
Hooks are interfaces to services external to the Airflow Cluster. While Operators provide a way to create tasks that may or may not communicate with some external service, hooks provide a uniform interface to access external services like S3, MySQL, Hive, Qubole, etc. Hooks are the building blocks for operators to interact with external services.
Tasks, Task Instances, And XCom
As mentioned in the previous section, any instance of the operator is referred to as a task. Each task is represented as a node in the DAG. Here’s an example of an operator being used to create a task.
run_this = BashOperator(
task_id='run_after_loop',
bash_command='echo 1',
dag=dag,
)
The above example is a bash operator, which takes a bash command as an argument. When the task executes, it runs the commands and the output can be found in the logs.
Link DAG Tasks
There are multiple ways to link tasks in a DAG to each other. Here’s a list of all the methods and we recommend using bitshift and relationship builders among these when needed to build a relationship while maintaining clean and readable code.
Set Upstream and Downstream
# this means task 2 will execute after task 1
task1.set_downstream(task2)
# this sets task 2 to run after task 1
task1.set_upstream(task2)
Bitshift Composition
task1 >> task2
# the above is the same as
task1.set_downstream(task2)task2 << task1
# which is the same as
task1.set_upstream(task2)# we can also chain these operators
# the line below chains task 2 after task 1 and task3 after 2, also task 4 is to be executed before task 3
task1 >> task2 >> task3 << task4# bitshift can also be used with lists
[task1, task2, task3] >> task4
[task1, task2, task3] >> task5
[task1, task2, task3] >> task6
Relationship Builders
chain and cross_downstream functions provide easier ways to set relationships between operators in a specific situation. Here are a few examples:
#  the last example demonstrated in bitshift composition can easily be replaced as this
cross_downstream([task1, task2, task3], [task4, task5, task6])
# also conditions like task1 >> task2 >> task3 >> task4 >> task5 can be replaced with:
chain(task1, task2, task3, task4, task5)
DAG Task Instance
Task Instance is a run of the task. While we define the tasks in a DAG, a DAG run is created when the DAG is executed, it contains the dag id and the execution date of the DAG to identify each unique run. Each DAG run consists of multiple tasks and every run of these tasks is referred to as a task instance.
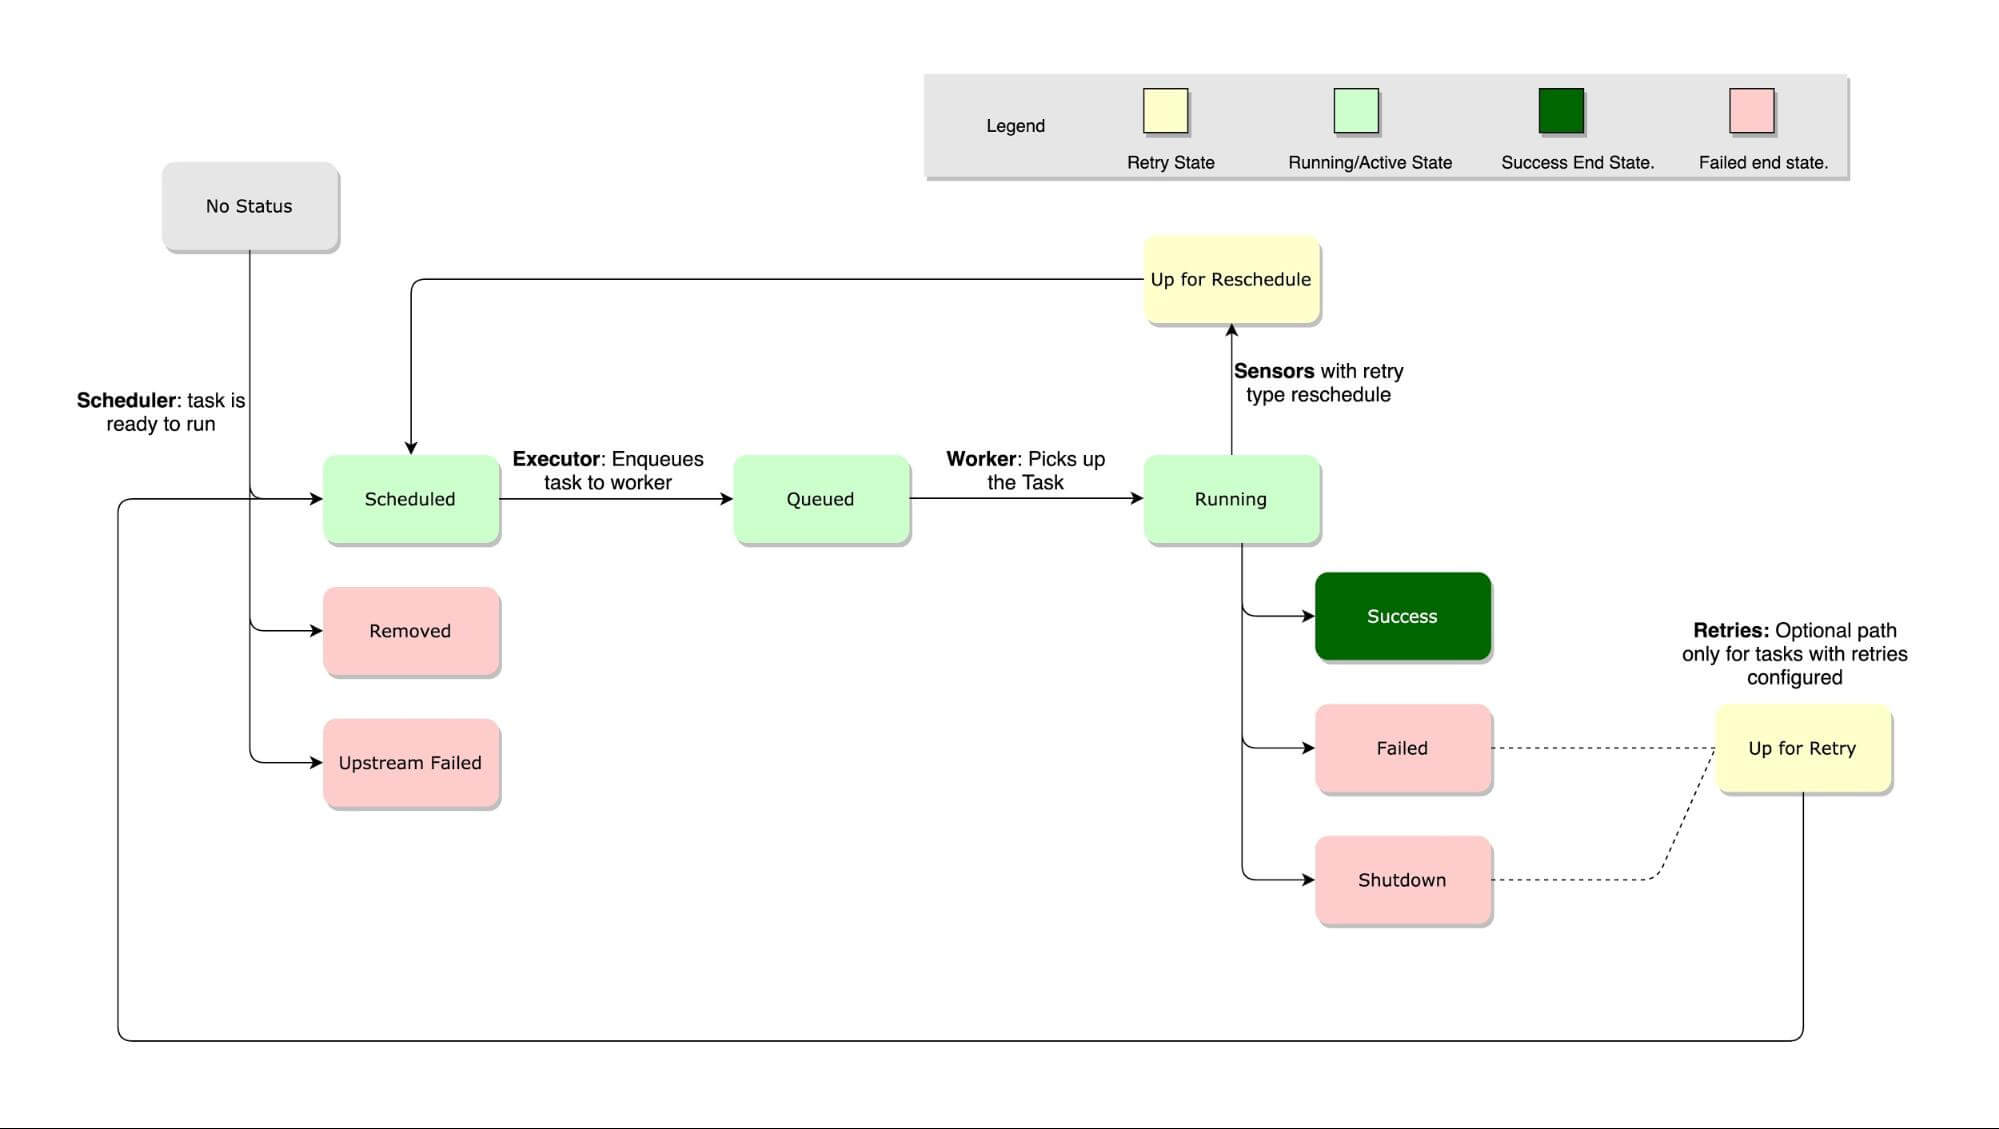
A task instance goes through multiple states when running and a complete lifecycle can be easily found on the Airflow docs page. The happy flow consists of the following stages:
- No status (scheduler created empty task instance)
- Scheduled (scheduler determined task instance needs to run)
- Queued (scheduler sent the task to the queue – to be run)
- Running (worker picked up a task and is now executing it)
- Success (task completed)
Here are all the states and the transitions of the task lifecycle.


Task Lifecycle
DAG XCom
XCom (cross-communication) provides a way of sharing messages or data between different tasks. Xcom at its core is a table that stores key-value pairs while also keeping tabs on which pair was provided by which task and dag. This is the Xcom table schema:
CID name type not null dflt_value pk 0 id INTEGER 1 1 1 key VARCHAR(51) 0 0 2 value BLOB 0 0 3 timestamp DATETIME 1 0 4 execution_date DATETIME 1 0 5 task_id VARCHAR(51) 1 0 6 dag_id VARCHAR(51) 1 0
As you can observe, the Xcom table keeps key-value pairs while keeping track of which task and run of the dag added it (using execution date, task_id, and dag_id). Xcom provides methods namely the xcom_push and xcom_pull to add and retrieve entries from or to the xcom table. Here’s an example of two methods that can be called in two different Python operators to communicate with each other.
# inside a PythonOperator called 'pushing_task'
# python operator adds the return value to xcom
def push_function():
return value# or someone can also do xcom push to push the value with
# provide_context=True
def push_function(**context):
context['task_instance'].xcom_push(key = 'test', value=value)# inside another PythonOperator where provide_context=True
def pull_function(**context):
value = context['task_instance'].xcom_pull(task_ids='pushing_task', key='test')
Xcom can also be used to populate dynamic content using templates:
SELECT * FROM {{ task_instance.xcom_pull(task_ids='foo', key='table_name') }}That’s a lot of theoretical content for this blog. All these concepts will help you write DAGs in your day-to-day job. In our next blog, we will cover some advanced concepts regarding schedules, triggers, and templating. Please sign-up for Qubole Free Trial to experience Qubole Airflow which is tightly integrated with the Qubole Open Data Lake Platform.


